The University of Massachusetts Amherst
Categories
Android Apps Google Apps

Organize your life with Taskary

Calendar apps are a popular way to organize your schedule and keep track of upcoming events and deadlines. One issue I have often had with these sorts of apps is that they tend to consider everything as an “event”. For example, if all I really need to know is that a paper is due on November 20th, I don’t really need to build in an arbitrary hour long “event” that’s happening on that day just to remember that my paper is due.

What I really want is a To-Do list, in this case, and that’s where Google calendar comes in. Even though the default item you can add to a calendar is an “Event”, with a start and end time, if you click beside it on “Task”, you can just add a single item with a name and a description.

Screenshot 2016-11-17 at 1.31.43 PM

Then, all it has is a checkbox for you to select once you’ve done it. No notifications about “upcoming events” or anything of the sort, just simple items on a calendar.

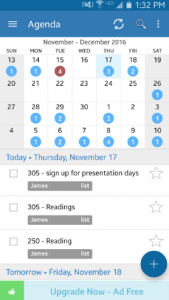
However, one downside to this is that the Gmail calendar apps don’t sync tasks. For Android, there is a solution. The app “Taskary” is a great choice, with both a free and premium version, to sync tasks to your phone. You can quickly look at your schedule of to-do list items, as well as check them off once you’re done. And it all syncs back to your google account.

Screenshot 2016-11-17 at 1.48.37 PM

For iOS users, or Android users who don’t want to install another app, the browser version of Google Calendar should let you access your tasks as well. But if you’re looking for a simple way to plan your schedule and deadlines, and have it accessible in a quick app, Taskary and Google Calendar are a great choice.

Categories
Security

Quick Tips: Remembering Complex Passwords

password_strength

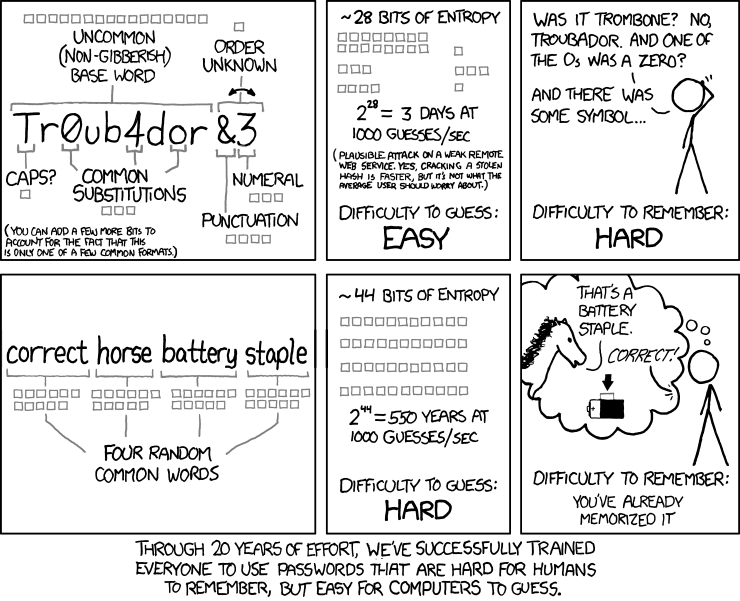
This XKCD comic notes a popular strategy to password security, using a series of words rather than a single word with special characters. But is this the best way to come up with a secure password that you can remember? Depending on what you create, the password may still not be very secure if it is low in complexity and the words you chose include common words like “password” or “umass”.

But remembering random letters and numbers is difficult, and might cause you to find yourself writing down passwords or forgetting them entirely. Another strategy is to come up with a phrase of words, like “correct horse battery staple”, but then only use certain letters. If you only think of the phrase in your head, and then use something like the first letter and last letter of each word, you keep the ease of remembering a simple phrase, but now have “cthebyse” in your password. Adding some special characters to this will make a very strong password.

Longer passwords are even better, so if you can come up with a scheme like this for a long phrase, your password will be even stronger. “Mary had a little lamb its fleece was white as snow” is easy to remember, and the first letter of each word produces “mhallifwwas”.

You won’t find this in a dictionary attack, and recalling this complex string as you type it out is as easy as remembering the lyrics in your head. Just make sure you add any special character and case requirements to the password, and you’re good to go!

Reference:
Monroe, Randall. “Xkcd: Password Strength.” Xkcd: Password Strength. N.p., n.d. Web.
…..17 Nov. 2016.

Categories
Google Apps

Organize your Gmail with filters

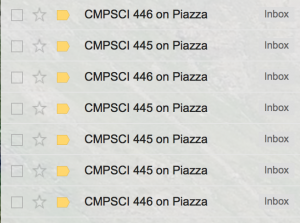
If you are an undergraduate at UMass Amherst, you have a Google Apps account for your student email. And, if you’re anything like me, sometimes your inbox can get a little cluttered from different classes and announcements.

Screen Shot 2016-02-10 at 10.58.30 AM

If you find yourself wishing to keep all of your emails but don’t need to see all of these mass emails every time they pop up, a Gmail filter might be of interest to you.

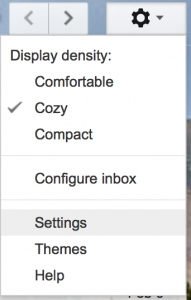
To see the options for Gmail filters, start by navigating to Settings and then click the “Filters and Blocked Addresses” tab.

Screen Shot 2016-02-10 at 11.16.45 AM

Click “Create a new filter”.

Screen Shot 2016-02-10 at 11.19.47 AM

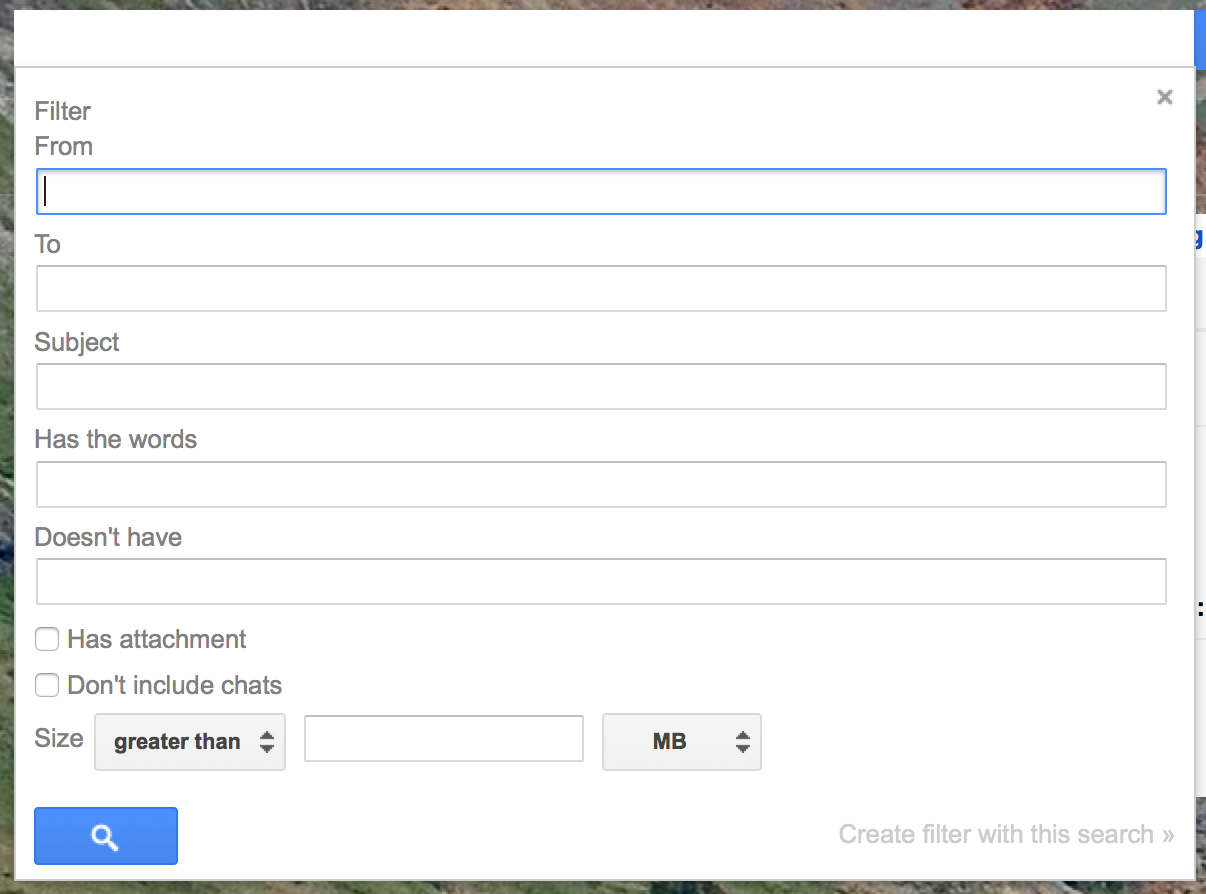
You will now see a few options for what your filter can be based on. For example, you can filter emails “From” a particular person or mailing list, you could filter emails with a certain keyword in the subject, or you could filter emails based on having or not having certain keywords.

Screen Shot 2016-02-10 at 11.01.23 AM

Once you’ve selected what types of emails you want to filter, click “Create filter with this search” and you will be presented with options of what to do with those filtered messages.

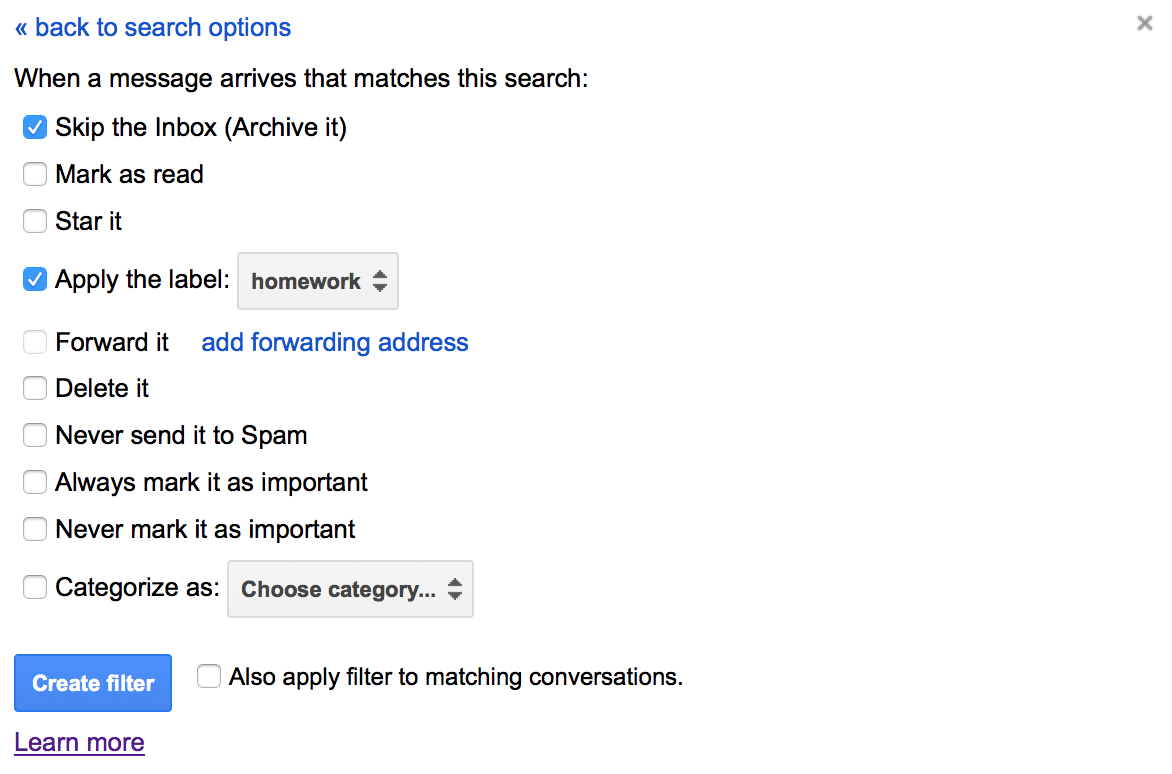
Screen Shot 2016-02-10 at 11.02.36 AM

Like the previous step in choosing what to filter, these options are basically up to you depending on what you want to do. Personally, I find it convenient to use the “Skip the inbox” and “Apply the label” options. The drop down will let you create new labels, with my example screenshot having a label named “homework”. This way, you aren’t deleting emails but won’t see them in your inbox until you click on the label you applied them to. In the following example, I created a filter for emails from Doodle which causes them to skip the inbox and go under the label “doodlemail”.

Screen Shot 2016-02-10 at 11.34.39 AM

Now my regular inbox won’t be flooded with notifications every time someone replies to my Doodle poll, and I can check it whenever I want. However, this is only one example of what you can create with the different filtering options. Maybe you want to star every email from career services, or make sure certain newsletters never get sent to spam. The choice is yours, and the power of filtering options will allow you to keep your inbox as organized as you’d like it to be.

Categories
email

Backup your student email with Mozilla Thunderbird

thunderbird4

For those of you graduating from UMass this spring, congratulations! It’s an exciting time to look ahead to the post-college life; however, before you head off on your future endeavors, it might be a good idea to backup your student email before you leave.

Why should I backup my email?

Your student email is deactivated one year after you leave the university. All other services (wireless access, Moodle, etc) are deactivated six months after leaving the university. Although for most people this is a year after graduating in May, the actual timeline is one year after you are last enrolled in anything at UMass – for example, if you graduate but take one final summer class to finish your degree, your email will be deactivated one year after that summer course ends.

There is no official need to backup your email, however many students find it convenient to still have those messages saved after graduating.

How do I backup my email?

To back up your email, you will need a third party mail client such as Mozilla Thunderbird, Apple Mail, or Microsoft Outlook. For the sake of this tutorial I will use Mozilla Thunderbird because it is both free and available for Mac OS and Windows, however if you prefer to use Apple Mail (which is pre-installed on any Mac) or Microsoft Outlook (available with many installations of Microsoft Office), those are perfectly fine as well. You will also need a non-UMass, personal email account such as a Gmail or Yahoo account.

1. Install Thunderbird

Thunderbird can be downloaded and installed from Mozilla’s website here:

https://www.mozilla.org/en-US/thunderbird/

2. Add your student email account to Thunderbird

This process will vary depending on what type of email you have with UMass. Please click one of the following articles for your operating system and email account type.

Google Apps Users (Undergraduates):

UMail Users (Graduate Students):

Exchange Users:

If you have an Exchange account, you may add the account to Apple Mail or Microsoft Outlook. Please click here for a list of articles on adding Exchange accounts to mail clients. If you are using Windows and do not have Outlook, you can try adding your account to Thunderbird as an IMAP account (use the settings listed in this article).

3. Allow Thunderbird to synchronize your mail

Thunderbird may take a few minutes to download all of your messages. After adding the account, you should see it listed on the left-hand column. Click Inbox to see your messages as they download.

4. Add a personal email account to Thunderbird

This can be any non-UMass email account which you would like to move your old school emails over to. A personal gmail or yahoo account should work, however you can use any email account which is able to be configured with Thunderbird.

5. Create a folder in your personal email account

You should now have two email accounts added to Thunderbird, one being your school email and the other being a personal email. They will both be listed on the left-hand column. Underneath your personal email account, create a new folder, named “umass backups” or whatever you’d like to call it. This folder is where we will migrate all of your UMass emails.

6. Begin moving folders into “umass backups”

Now that you have both accounts in the same place, you can click the Inbox (and any other folders) underneath your student account in the left-hand column, and drag that down into the “umass backups” folder under your personal account. Thunderbird will now copy everything over to the personal account. Please note that this process may take some time.

7. Check to make sure your files moved over.

After everything has been moved, Thunderbird will synchronize your personal email account and everything should now be copied into that account. It might be a good idea to log into the web client for your personal email to check and make sure the “umass backups” folder is there and up to date.

Questions?

If you have questions about this process, please contact IT User Services at 413-545-9400 or it@umass.edu. Additionally, if you prefer to use Apple Mail or Outlook for this process, instructions on adding university email accounts to these programs can be found on our website under support center articles.

http://www.it.umass.edu/google-apps

http://www.it.umass.edu/exchange

http://www.it.umass.edu/email/umail


Categories
Apps

Welcome class of 2019! What you need to know about IT at UMass.

UMass Amherst IT would like to welcome the incoming freshman class to campus! As you move in and go through the first week of classes and fall New Student Orientation, you’ll discover the countless web services and technologies used at UMass Amherst. We see many freshman coming into our Help Center during this time to ask questions, and we are here to help in the Lederle Graduate Research Center lowrise, room A109, from 8:30 am – 4:45 pm (the building right across the street from Northeast dorms on the first floor), as well as the W.E.B DuBois Library Learning Commons during the day and after hours until midnight.

But, if you prefer not to make the walk up from Southwest or down from Orchard Hill, there’s quite a bit of information on our website at it.umass.edu and I’d like to take this time to highlight answers to what are some of our most frequently asked questions from new students:


1.) How do I connect to the wifi?

Eduroam – FAQ

Access to the wireless network is vital for any student living on campus, and is one of the first things you may do after moving in. You will see two networks in most areas of campus, “UMASS” and “eduroam”.

The basic process for most devices is as follows:

1.) Connect to the UMASS network.

2.) Open a browser (Safari, Chrome, Firefox, etc.) and try to load any web page. You should be redirected with a “wireless at UMass Amherst” page with a yellow rectangular “eduroam” button near the top. If you do not see this page, type login.wireless.umass.edu into your browser to view the page directly.

3.) Click the yellow “Connect to eduroam” button at the top of the page.

4.) Enter your netid and password on the Web Login portal and follow the instructions.

For more detailed instructions, please follow the links here:

Windows – connect to eduroam (also works for Windows 10)

Mac OS X – connect to eduroam

Ubuntu – connect to eduroam

iOS – connect to eduroam

Android – connect to eduroam (note: many find the manual configuration easier and faster to set up for Android devices, however running xpressconnect is still an option if you choose to do so).

A few things to note about other devices:

Windows Phones are unable to connect to the eduroam network due to their lack of support for TTLS. We would advise Windows phone users in need of a network connection to use UMASS, however keep in mind this network is not secure and will not keep you logged in for extended periods of time.

Game Consoles are typically unable to connect to the eduroam network, however consoles with a regular web browser should be able to connect to UMASS by going to login.wireless.umass.edu. Please do not run the xpressconnect application for eduroam on your gaming devices, as it may cause problems with your device. UMass Amherst Information Technology is working on developing access for gaming devices in the future, however this project is ongoing and is still in early pilot stages.


2.) How do I check my email?

Undergraduate students at UMass Amherst have Google Apps accounts. Students can check their university email by logging into Google Apps at apps.umass.edu with your NetID and password, or by going to mail.google.com and entering your NetID@umass.edu, which will redirect to the apps.umass.edu web login portal.

Note that your NetID and Password are the same as what you use to log in to both Spire and Moodle and pretty much any other service at UMass. If you are having trouble logging into Google Apps, try the “Forgot Your Password?” link on the spire home page to reset your password.


3.) How do I get my email on my phone?

To add your UMass email account to most mail applications, you will likely need to log in to your account in a web browser so that you can generate an application specific password for your device (phone, tablet, etc). Click here for more detailed instructions on this process and manual configuration details for Apps at UMass.

However, if you are using single sign-on for Android or the iOS Gmail app, this article outlines the quick configuration process for these applications.

If you are using an iOS device using iOS 8 or above (iPhone 4S and above), you can configure your Google Apps Mail by doing the following:

1) Go to settings

2) Go to Mail Accounts and Select Add New

3) Select Google, a Google sign in page should appear

4) Enter your netID@umass.edu and select sign in, you will be brought to the UMass log in page

5) Sign in again and give the device the permissions requested and save the account


4.) How do I get Microsoft Office as a UMass student?

Students can download Microsoft Office 365 for free by following the instructions in this article. Please make sure you follow the instructions carefully and remember the password you create when you sign up for office. Office 365 works for both Mac OS and Windows computers.


5.) How do I print on campus?

The Learning Commons in the lower level of the W.E.B Du Bois Library and the Engineering Library on the second floor of the Lederle Graduate Research Center lowrise both have printers available to students, and other computer classrooms on campus also allow for printing. To print remotely, you can download and install the remote printing software to send your print request to any of these locations. You can also visit these locations and sign into a local computer and then print directly from that computer if you have your documents on a flash drive or in your google drive account.

Click here for instructions on how to install the remote printing software. (NOTE: as of 9/4/15, Windows 10 cannot be set up with remote printing)

Students also have 100 free prints each semester, however if you need to add more you can pay with your UCard Debit account for $0.10 per page. The Printing FAQ article here explains how to pay for printing in more detail.


6.) How do I use the computers in the library and computer classrooms?

You can sign into the W.E.B Du Bois Library Learning Commons and computer classroom machines with your NetID and password. However, you will first need to activate computer classroom access on Spire. After logging into Spire, go to Main Menu > IT Accounts > PC Classrooms and then enter your password and click “Enable Classroom Login”. After a few minutes, you should have access to the computers. This activation process should only need to be performed once, from then on you can log into the library computers whenever you need to.


7.) What antivirus software is offered by UMass IT?

UMass IT offers McAfee to members of the university, available for download through the IT website.

Link to download for Windows computers.

Link to download for Mac OS computers.

You will need to sign in with your NetID and password when accessing those links. After you log in, you should see a green button labeled “McAfee Security for Mac/Windows” which will download the software installer to your computer. Keep in mind that it is usually not a good idea to have more than one antivirus program on your computer. While having certain programs that are meant for virus removal such as Malwarebytes on your computer alongside antivirus programs is okay, if you already have an antivirus program such as Norton, a different trial version of McAfee, Avast, or AVG, you should uninstall those programs first if you would like to use the university’s McAfee download.


8.) Other questions?

More articles and resources are available on the IT website. We are also able to help answer any questions you may have or assist you with any of these topics in person for free in our Help Center in the Lederle Graduate Research Center room A109 from 8:30 am – 4:45 pm Monday through Friday or by phone at 413-545-9400.

You can also email us at it@umass.edu with questions or use our live chat support by clicking the link under Get IT Help on our website. The Learning Commons also has a desk staffed with at least one IT consultant during the day in the W.E.B Du Bois Library.

We hope you have a great semester and a wonderful Fall NSO this weekend, go UMass!


Categories
Operating System

The Year 2038 Problem

january

Many of us have either heard of or remember the “Y2k” bug, a software issue in the 1990’s where certain systems were likely to break on January 1, 2000 when date and times would need to rollover to a year ending in 00. Many programmers and software engineers worked on resolving this issue as the nineties drew to a close, and were able to fix most bugs early on to avoid any catastrophes so that our computers and machines could live happily ever after.

Yet another technical quirk which poses a threat to older systems looms on the horizon – 03:14:07 UTC, January 19, 2038.

What is the Year 2038 Problem?

It all starts with how 32-bit UNIX systems keep track of time. These types of systems essentially keep track of time by counting how many seconds have passed since January 1, 1970, often referred to as “the epoch”. When a computer figures out what the time/day/year is, it is storing a single number which represents how long ago January 1, 1970 was in seconds.

Why January 19, 2038?

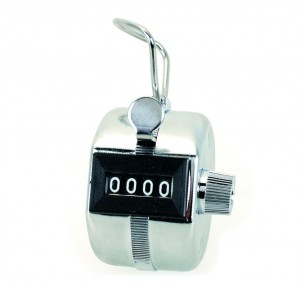
Consider this method of timekeeping to be like a pitch counter.

counter

To a computer, January 1, 1970 is “0000” like in this picture. Now, as an example, let’s say that you use your pitch counter to keep track of what month it is, so after thirteen months have passed you’d look at your counter and see “0013”. After one hundred and sixty two months, you see “0162” and so on.

Now, say you keep using your counter for months and months and months, and eventually you’ll reach a point where 9999 months have passed. But when you click your counter to go to month 10,000 you end up back at “0000”.

Why is the computer running out of digits?

There is one piece missing from the pitch counter analogy, and that is negative numbers, but we’ll get to that in a moment.

32-bit UNIX systems store this time variable in a 32-bit signed integer. This looks like a big string of ones and zeroes which is 32 characters long, e.g. “01001011011101011001011010001100”.

This is a certain number of seconds represented in binary. In binary, you can represent (2^n) – 1 numbers where “n” is the number of digits you have. So a binary number three digits long could represent up to (2^3) – 1, which is seven.

Because the number a computer uses to keep track of time is 32 bits, or “digits” long, it would be able to represent (2^32) – 1 seconds since 1970. However, because it is “signed” the first digit is basically used as a plus or minus symbol to designate whether it’s a negative or positive number. So it can actually represent any number from “positive (2^31) – 1″ down to “negative (2^31) – 1″.

This means the biggest number of seconds it can hold with a 32 bit signed integer is (2^31) – 1 seconds, which as a whole number is 2,147,483,647 seconds.

What, then, is “January 1, 1970” plus “2,147,483,647 seconds”?

Exactly 03:14:07, January 19, 2038.

Why can’t we just add more digits?

Like a pitch counter, the number of digits it is able to hold is constrained by how it’s built physically. The CPU and operating system aren’t designed to be able to handle a further date than January 19, 2038.

Newer systems use 64 bits for keeping track of data, which is quite larger than what you can represent with 32 bits. But many systems still using these 32 bit time stamps will encounter problems when 2038 rolls around if they haven’t been switched over to newer systems or upgraded.

Why would anyone still be using these systems 23 years from now?

There are tons of programs and systems which are decades old at this point and are still in use today, and technical bugs so far into the future often weren’t a concern when these programs were originally developed. But now any system which relies on a 32-bit UNIX time stamp such as a database, file system, factory machinery or even file formats will need to be switched over to a 2038 compliant system within the next twenty three years.

That can seem a long way off with plenty of preparation time, especially in a field like technology where everything is constantly evolving, but for a government or company which doesn’t have the funds to rebuild the code used in all the public transit systems or in a hard to access location like a satellite or in a thirty year old database, it will probably be a while before the pressure is on to switch over everything still in use to something new.


Sources:

https://en.wikipedia.org/wiki/Year_2038_problem

http://www.timeanddate.com/calendar/monthly.html?year=2038&month=1&country=1

Categories
Adobe

Quickly add a shaded border to an image in Adobe Photoshop

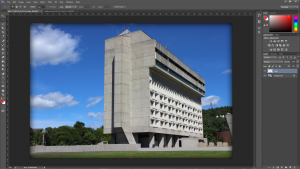
In this tutorial, we’ll see how to quickly add a shaded border to a photo in Adobe Photoshop like so:

slide 5

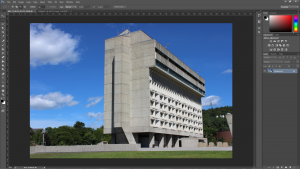
Begin by opening your photo of choice.

slide 1

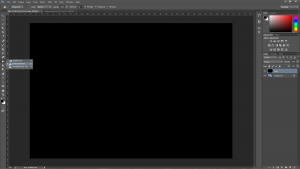
Next, create a new layer, by going to “Layer > New Layer” (or, by using the keyboard shortcut “Ctrl + Shift + N” on Windows or “Cmd + Shift + N” on a Mac). Click on the new layer in the layers panel on the right to make sure it is selected, and then select the Paint Bucket tool in the tools panel on the left. Pick the foreground color you would like to use for your shaded border (in this example we use black, but you can use any color) and then fill the new layer with your color of choice.

slide 2

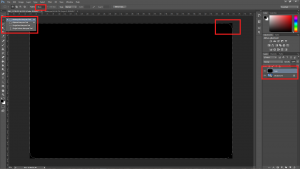
After filling the new layer, we will use the Rectangular Marquee Tool to create our border. Select the tool, and make sure its Feather attribute (located in the upper left) is greater than 0. Depending on the size of your image, and how much of a border you want visible, this will vary. My image is quite large so I have a feather of 80 pixels, however a small image may work best with only 12 pixels. After choosing a feather radius, drag and select the entire size of your canvas. You can begin outside the upper left corner and drag over the whole image to make sure you have it selected completely over each edge. When you release holding your mouse-click, the rectangle will now show a dotted line with curved edges. If the curve is too large or small for what you want to do, simply change the feather radius and try again.

slide 3

Now that we have our feathered selection, press the delete key or go to “Edit > Cut” to clear the middle of the full color layer. Your original photo will now show through underneath with the added border on top.

slide 4

Experiment with different colors and feather radii to see what you can create!

slide 6


Categories
Adobe Software

Adobe Illustrator Basics – Image Trace

For a quick and easy effect in Adobe Illustrator, the Image Trace feature offers a way to convert a photo or similar image into a vector trace of colors and shapes.

Categories
Adobe Software

Adobe Illustrator Basics – Gradient Tool

The gradient tool can be accessed from the main menu by going to “Window > Gradient”. Here, I have drawn a square shape which we will apply the gradient effects on.

Categories
Adobe Operating System Software

Adobe Illustrator Basics – Pencil Tool

The pencil tool is a great tool for creating freeform shapes and lines in Adobe Illustrator.

Categories
Adobe Software

Adobe Illustrator Basics – Line Tools

Following the shape tools is a menu which offers several tools for creating different types of lines and strokes.

Categories
Adobe Software

Adobe Illustrator Basics – Shape Tools

In this tutorial, we will learn about the basic tools for creating shapes in Adobe Illustrator.