The University of Massachusetts Amherst
Categories
Hardware

Future Proofing: Spending less and getting more


Future proofing, at least when it comes to technology, is a philosophy that revolves around buying the optimal piece of tech at the optimal time. The overall goal of future proofing is to save you money in the long run by purchasing devices that take a long time to become obsolete.

But, you might ask, what exactly is the philosophy? Sure, it’s easy to say that its best to buy tech that will last you a long time, but how do you actually determine that?

There are four basic factors to consider when trying to plan out a future proof purchase.

  1. Does what you’re buying meet your current needs, as well as needs you might have in the foreseeable future?
  2. Can what you’re buying be feasibly upgraded down the line?
  3. Is what you’re buying about to be replaced by a newer, better product?
  4. What is your budget?

I’m going to walk you through each of these 4 ideas, and by the end you should have a pretty good grasp on how to make smart, informed decisions when future-proofing your tech purchases!

Does what you’re buying meet your current needs, as well as needs you might have in the foreseeable future?


This is the most important factor when trying to make a future-proof purchase. The first half is obvious: nobody is going to buy anything that doesn’t do everything they need it to do. It’s really the second half which is the most important aspect.

Let’s say you’re buying a laptop. Also, let’s assume that your goal is to spend the minimum amount of money possible to get the maximum benefit. You don’t want something cheap that you’ll get frustrated with in a few months, but you’re also not about to spend a downpayment on a Tesla just so you can have a useful laptop.

Let’s say you find two laptops. They’re mostly identical, albeit for one simple factor: RAM. Laptop A has 4gb of RAM, while Laptop B has 8gb of RAM. Let’s also say that Laptop A is 250 dollars, while Laptop B is 300 dollars. At a difference of 50 dollars, the question that comes to mind is whether or not 4gb of RAM is really worth that.

What RAM actually does is act as short term storage for your computer, most important in determining how many different things your computer can remember at once. Every program you run uses up a certain amount of RAM, with things such as tabs on Google Chrome famously taking up quite a bit. So, essentially, for 50 dollars you’re asking yourself whether or not you care about being able to keep a few more things open.

Having worked retail at a major tech store in my life, I can tell you from experience that probably a little over half of everyone asked this question would opt for the cheaper option. Why? Because they don’t think that more RAM is something that’s worth spending extra money at the cash register. However, lots of people will change their mind on this once you present them with a different way of thinking about it.

Don’t think of Laptop A as being 250 and Laptop B as being 300. Instead, focus only on the difference in price, and whether or not you think you’d be willing to pay that fee as an upgrade.

You see, in half a year, when that initial feeling of spending a few hundred dollars is gone, it’s quite likely that you’ll be willing to drop an extra 50 dollars so you can keep a few more tabs open. While right now it seems like all you’re doing is making an expensive purchase even more expensive, what you’re really doing is making sure that Future_You doesn’t regret not dropping the cash when they had an opportunity.

Don’t just make sure the computer your buying fits your current needs. Make sure to look at an upgraded model of that computer, and ask yourself; 6 months down the line, will you be more willing to spend the extra 50 dollars for the upgrade? If the answer is yes, then I’d definitely recommend considering it. Don’t just think about how much money you’re spending right now, think about how the difference in cost will feel when you wish that you’d made the upgrade.

For assistance in this decision, check the requirements for applications and organizations you make use of. Minimum requirements are just that, and should not be used as a guide for purchasing a new machine. Suggested requirements, such as the ones offered at UMass IT’s website, offer a much more robust basis from which to future-proof your machine.

Can what you’re buying be meaningfully upgraded down the line?

This is another important factor, though not always applicable to all devices. Most smartphones, for example, don’t even have the option to upgrade their available storage, let alone meaningful hardware like the RAM or CPU.

However, if you’re building your own PC or making a laptop/desktop purchase, upgradeability is a serious thing to consider. The purpose of making sure a computer is upgradeable is to ensure that you can add additional functionality to the device while having to replace the fewest possible components.

Custom PCs are the best example of this. When building a PC, one of the most important components that’s often overlooked is the power supply. You want to buy a power supply with a high enough wattage to run all your components, but you don’t want to overspend on something with way more juice than you need, as you could have funneled that extra cash into a more meaningful part.

Lets say you bought a power supply with just enough juice to keep your computer running. While that’s all fine right now, you’ll run into problems once you try to make an upgrade. Let’s say your computer is using Graphics Card A, and you want to upgrade to Graphics Card B. While Graphics Card A works perfectly fine in your computer, Graphics Card B requires more power to actually run. And, because you chose a lower wattage power supply, you’re going to need to replace it to actually upgrade to the new card.

In summary, what you planned to just be a simple GPU swap turned out to require not only that you pay the higher price for Graphics Card B, but now you need to buy a more expensive power supply as well. And, sure, you can technically sell your old power supply, you would have saved much more money (and effort) in the long run by just buying a stronger power supply to start. By buying the absolute minimum that you could to make your computer work, you didn’t leave yourself enough headroom to allow the computer to be upgraded.

This is an important concept when it comes to computers. Can your RAM be upgraded by the user? How about the CPU? Do you need to replace the whole motherboard just to allow for more RAM slots? Does your CPU socket allow for processors more advanced than the one you’re currently using, so you can buy cheap upgrades once newer models come out?

All of these ideas are important when designing a future-proof purchase. By ensuring that your device is as upgradeable as possible, you’re increasing its lifespan by allowing hardware advancements in the future to positively increase your device’s longevity.

Is what you’re buying about to be replaced by a newer, better product?

This is one of the most frustrating, and often one of the hardest-to-determine aspects of future proofing.

We all hate the feeling of buying the newest iPhone just a month before they reveal the next generation. Even if you’re not the type of person that cares about having the newest stuff, it’s to your benefit to make sure you aren’t making purchases too close to the release of the ‘next gen’ of that product. Oftentimes, since older generations become discounted upon the release of a replacement, you’d even save money buying the exact same thing by just waiting for the newer product to be released.

I made a mistake like this once, and it’s probably the main reason I’m including this in the article. I needed a laptop for my freshman year at UMass, so I invested in a Lenovo y700. It was a fine laptop — a little big but still fine — with one glaring issue: the graphics card.

I had bought my y700 with the laptop version of a GTX 960 inside of it, NVidias last-gen hardware. The reason this was a poor decision was because, very simply, the GTX 1060 had already been released. That is, the desktop version had been released.

My impatient self, eager for a new laptop for college, refused to wait for the laptop version of the GTX 1060, so I made a full price purchase on a laptop with tech that I knew would be out of date in a few months. And, lo and behold, that was one of the main reasons I ended up selling my y700 in favor of a GTX 1060 bearing laptop in the following summer.

Release dates on things like phones, computer hardware and laptops can often be tracked on a yearly release clock. Did Apple reveal the current iPhone in November of last year? Maybe don’t pay full price on one this coming October, just in case they make that reveal in a similar time.

Patience is a virtue, especially when it comes to future proofing.

What is your budget?


This one is pretty obvious, which is why I put it last. However, I’m including it in the article because of the nuanced nature of pricing when buying electronics.

Technically, I could throw a 3-grand budget at a Best Buy employee’s face and ask them to grab me the best laptop they’ve got. It’ll almost definitely fulfill my needs, will probably not be obsolete for quite awhile, and might even come with some nice upgradeability that you may not get with a cheaper laptop.

However, what if I’m overshooting? Sure, spending 3 grand on a laptop gets me a top-of-the-line graphics card, but am I really going to utilize the full capacity of that graphics card? While the device you buy might be powerful enough to do everything you want it to do, a purchase made by following my previously outlined philosophy on future proofing will also do those things, and possibly save you quite a bit of money.

That’s not to say I don’t advocate spending a lot of money on computer hardware. I’m a PC enthusiast, so to say that you shouldn’t buy more than you need would be hypocritical. However, if your goal is to buy a device that will fulfill your needs, allow upgrades, and be functional in whatever you need it to do for the forseeable future, throwing money at the problem isn’t really the most elegant way of solving it.

Buy smart, but don’t necessarily buy expensive. Unless that’s your thing, of course. And with that said…


…throwing money at a computer does come with some perks.

Categories
Hardware

Water Damage: How to prevent it, and what to do if it happens

Getting your tech wet is often one of the most common things that people tend to worry about when it comes to their devices. Rightfully so; water damage is often excluded from manufacturer warranties, can permanently ruin technology under the right circumstances, and is one of the easiest things to do to a device without realizing it.

What if I told you that water, in general, is one of the easiest and least-likely things to ruin your device, if reacted to properly?

Don’t get me wrong; water damage is no laughing matter. It’s the second most common reason that tech ends up kicking the bucket, the most common being drops (but not for the reason you might think). While water can quite easily ruin a device within minutes, most, if not all of its harm can be prevented if one follows the proper steps when a device does end up getting wet.

My goal with this article is to highlight why water damage isn’t as bad as it sounds, and most importantly, how to react properly when your shiny new device ends up the victim to either a spill… or an unfortunate swan dive into a toilet.

_________________

Water is, in its purest form, is pretty awful at conducting electricity. However, because most of the water that we encounter on a daily basis is chock-full of dissolved ions, it’s conductive enough to cause serious damage to technology if not addressed properly.

If left alone, the conductive ions in the water will bridge together several points on your device, potentially allowing for harmful bursts of electricity to be sent places which would result in the death of your device.

While that does sound bad, here’s one thing about water damage that you need to understand: you can effectively submerge a turned-off device in water, and as long as you fully dry the whole thing before turning it on again, there’s almost no chance that the water will cause any serious harm.

Image result for underwater computer

You need to react fast, but right. The worst thing you can do to your device once it gets wet is try to turn it on or ‘see if it still works’. The very moment that a significant amount of water gets on your device, your first instinct should be to fully power off the device, and once it’s off, disconnect the battery if it features a removable one.

As long as the device is off, it’s very unlikely that the water will be able to do anything significant, even less so if you unplug the battery. The amount of time you have to turn off your device before the water does any real damage is, honestly, complete luck. It depends on where the water seeps in, how conductive it was, and how the electricity short circuited itself if a short did occur. Remember, short circuits are not innately harmful, it’s just a matter of what ends up getting shocked.

Once your device is off, your best chance for success is to be as thorough as you possibly can when drying it. Dry any visible water off the device, and try to let it sit out in front of a fan or something similar for at least 24 hours (though please don’t put it near a heater).

Rice is also great at drying your devices, especially smaller ones. Simply submerge the device in (unseasoned!) rice, and leave it again for at least 24 hours before attempting to power it on. Since rice is so great at absorbing liquids, it helps to pull out as much water as possible.

Image result for phone in rice

If the device in question is a laptop or desktop computer, bringing it down to us at the IT User Services Help Center in Lederle A109 is an important option to consider. We can take the computer back into the repair center and take it apart, making sure that everything is as dry as possible so we can see if it’s still functional. If the water did end up killing something in the device, we can also hopefully replace whatever component ended up getting fried.

Overall, there are three main points to be taken from this article:

Number one, spills are not death sentences for technology. As long as you follow the right procedures, making sure to immediately power off the device and not attempt to turn it back on until it’s thoroughly dried, it’s highly likely that a spill won’t result in any damage at all.

Number two is that, when it comes to water damage, speed is your best friend. The single biggest thing to keep in mind is that, the faster you get the device turned off and the battery disconnected, the faster it will be safe from short circuiting itself.

Lastly, and a step that many of us forget about when it comes to stuff like this; take your time. A powered off device that was submerged in water has an really good chance at being usable again, but that chance goes out the window if you try to turn it on too early. I’d suggest that for smartphones and tablets, at the very least, they should get a thorough air drying followed by at least 24 hours in rice. For laptops and desktops, however, your best bet is to either open it up yourself, or bring it down the Help Center so we can open it up and make sure it’s thoroughly dry. You have all the time in the world to dry it off, so don’t ruin your shot at fixing it by testing it too early.

I hope this article has helped you understand why not to be afraid of spills, and what to do if one happens. By following the procedures I outlined above, and with a little bit of luck, it’s very likely that any waterlogged device you end up with could survive it’s unfortunate dip.

Good luck!

Categories
Operating System

CPU Overclocking: Benefits, Requirements and Risks

The Benefits of Overclocking

Overclocking is, essentially, using the settings present on the motherboard in order to have the CPU run at higher speeds than what it’s set to run by default. This comes at the cost of increased heat production, as well as potential reduction of lifespan, though for many people the benefits far outweigh the risks.

Overclocking allows you to basically get ‘free’ value from your hardware, potentially letting the CPU last longer before it needs an upgrade, as well as just generally increasing performance in high demand applications like gaming and video editing. A good, successful overclock can grant as much as a 20% performance increase or more, as long as you’re willing to put in the effort.

Requirements 

Overclocking is pretty simple nowadays, however, there are some required supplies and specifications to consider before you’ll be able to do it. For most cases, only computers that you put together yourself will really be able to overclock, as pre-built ones will rarely have the necessary hardware, unless you’re buying from a custom PC builder.

The most important thing to consider is whether or not your CPU and Motherboard even support overclocking. For Intel computers, any CPU with a “K” on the end of it’s name, such as the recently released i7-7700k, will be able to overclock. AMD has slightly different rules, with many more of their CPUs being unlocked for overclockers to tinker with. Always check the specific SKU that you’re looking at on the manufacturer’s website, so you can be sure it’s unlocked!

Motherboards are a bit more complicated. For Intel chips, you’ll need to pick up a motherboard that has a “Z” in the chipset name, such as the Z170 and Z270 motherboards which are both compatible with the previously mentioned i7-7700k. AMD, once again, is a bit different. MOST of their motherboards are overclock-enabled, but once again you’re going to want to look at the manufacturer’s websites for whatever board you’re considering.

Another thing to consider is the actual overclocking-related features of the motherboard you get. Any motherboard that has the ability to overclock will be able to overclock to the same level (though this was not always the case), but some motherboards have built in tools to make the process a bit easier. For instance, some Asus and MSI motherboards in particular have what is essentially an automated overclock feature. You simply click a button in the BIOS (the software that controls your motherboard), and it will automatically load up a fairly stable overclock!

Of course, the automatic system isn’t perfect. Usually the automated overclocks are a bit conservative, which guarantees a higher level of stability, at the cost of not fully utilizing the potential of your chip. If you’re a tinkerer like me who wants to get every drop of performance out of your system, a manual overclock is much more effective.

The next thing to consider is your cooling system. One of the major byproducts of overclocking is increased heat production, as you usually have to turn up the stock voltage of the CPU in order to get it to run stably at higher speeds. The stock coolers that come in the box with some CPUs are almost definitely not going to be enough, so much so that Intel doesn’t even include them in the box for their overclockable chips anymore!

You’re definitely going to want to buy a third party cooler, which will run you between 30-100 dollars for an entry level model, depending on what you’re looking for. Generally speaking, I would stick with liquid cooling when it comes to overclocks, with good entry level coolers like the Corsair h80i and h100i being my recommendations. Liquid cooling may sound complicated, though it’s fairly simple as long as you’re buying the all-in-one units like the Corsair models I mentioned above. Custom liquid cooling is a whole different story, however, and is WAY out of the scope of the article.

If you don’t want to fork over the money for a liquid cooling setup, air cooling is still effective on modern CPUS. The Coolermaster Hyper Evo 212 is a common choice for a budget air cooler, running just below 40 bucks. However, air cooling isn’t going to get you the same low temperatures as liquid cooling, which will not let you get as high of an overclock unless you want to compromise the longevity of your system.

The rest of the requirements are pretty mundane. You’re going to want a power supply that can handle the higher power requirement of your CPU, though to be honest this isn’t really an issue anymore. As long as you buy a highly rated power supply from a reputable company of around 550 watts or higher, you should be good for most builds. There are plenty of online “tier-lists” for power supplies; stick to tier one or two for optimal reliability.

The only other thing you’ll need to pick up is some decent-quality thermal compound. Thermal compound, also called thermal paste, is basically just a grey paste that you put between the CPU cooler and the CPU itself, allowing for more efficient heat transfers. Most CPU coolers come with thermal paste pre-applied, but the quality can be dubious depending on what brand the cooler is. If you want to buy your own, I recommend IC Diamond or Arctic Silver as good brands for thermal compound.

Risks

Overclocking is great, but it does come with a few risks. They aren’t nearly as high as they used to be, given the relative ease of modern overclocking, but they’re risks to be considered nonetheless.

When overclocking, what we’re doing is increasing the multiplier on the CPU, allowing it to run faster. The higher we clock the CPU, the higher voltage the CPU will require, which will thus produce more heat.

Heat is the main concern of CPUs, and too much heat can lead to a shorter lifespan for the chip. Generally speaking, once you’re CPU is consistently running at above 86 degrees Celsius, you’re starting to get into the danger zone. Temperatures like that certainly won’t kill your CPU immediately, but it could overall lower the functional lifespan.

For most people, this won’t really be an issue. Not many people nowadays plan on having their computer last for 10 years and up, but it could be something to be worried about if you do want to hold onto the computer for awhile. However, as long as you keep your temperatures down, this isn’t really something you need to worry about. Heat will only outright kill a CPU when it exceeds around 105 degrees Celsius, though your CPU should automatically shut off at that point.

The other main risk is voltage. As previously mentioned, in order to achieve higher overclocks you also need to increase the voltage provided to the CPU. Heat is one byproduct of this which is a problem, but the voltage itself could also be a problem. Too high voltage on your CPU can actually fry the chip, killing it.

For absolute safety, many people recommend not going above 1.25v, and just settling for what you can get at that voltage. However, most motherboards will allow you to set anything up to 1.4v before notifying you of the danger.

My personal PC runs at 1.3v, and some people do go as high as 1.4v without frying the chip. There really isn’t a hard and fast rule, just make sure to check out what kind of voltages people are using for the hardware you bought, and try to stick around that area.

Essentially, as long as you keep the CPU cool (hence my recommendation for liquid cooling), and keep the voltages within safe levels (I’d say 1.4v is the absolute max, but I don’t recommend even getting close to it), you should be fine. Be wary, however, as overclocking will void some warranties depending on who you’re buying the CPU from, especially if the CPU ends up dying due to voltage.

Afterthoughts – The Silicon Lottery

Now that you understand the benefits of overclocking, as well as the risks and requirements, there’s one more small concept; the silicon lottery.

The silicon lottery is the commonly used term to describe variance in CPU overclocks, depending on your specific CPU. Basically; just because you bought the same model of CPU as someone else doesn’t mean it will run at the same temperatures and overclock to the same point.

I have an i7-7700k that I’m cooling with a Corsair h100i v2. I am able to hold a stable 5ghz overclock at 1.3v, the stock settings being 4.2ghz at around 1.2v. However, not everyone is going to achieve results like this. Some chips might be able to hit 5ghz at slightly below 1.3v, some might only be able to achieve 4.8 at 1.3v. It really is just luck, and is the main reason that overclocking takes time to do. You can’t always set your CPU to the same settings as someone else, expecting it to work. It’s going to require some tinkering.

Hopefully, this article has helped you understand overclocks more. There are some risks, as well as some specific hardware requirements, but from my perspective they’re all worth the benefits.

Always remember to do your research, and check out a multitude of overclocking guides. Everyone has different opinions on what voltages and temperatures are safe, so you’ll need to check out as many resources as possible.
If you do decide that you want to try overclocking, then I wish you luck, and may the silicon lottery be ever in your favor!

Categories
Hardware

Should you get a Surface or a MacBook Air?

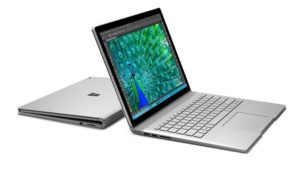
The Surface Book

The MacBook Air

When it comes to portable devices aimed at a college going audience, not many products can really compare to the sleek and powerful MacBook Air and Surface computers, each fulfilling a similar role as per the design of Apple and Microsoft respectively.

While both computers are excellent, they’re quite difficult to choose between. Both are offered at similar sub two-thousand-dollar price points, and both are designed with portability and aesthetics as the major goals of the devices. However, there are a number of key differences which can be highlighted that can help to make the decision when purchasing one of these machines.

Interface and Form Factor

The form factors of each device are strikingly different, with some variation depending on the specific model purchased. The MacBook Air comes in both 11 and 13-inch variants, with the 13 inch boasting some spec increases to boot. Surfaces, however, are a little more varied. If you’re looking for the newest devices on the market (which I would personally recommend), you’re essentially deciding between the Surface Pro 4 and the Surface Book.

Microsoft-Surface-Pro-4

While the Surface Pro 4 is essentially a tablet computer with an optional attachable keyboard, much like an iPad, the Surface Book is much more of a dedicated laptop-style device. Many people will prefer this style, as the more robust keyboard makes typing a much more pleasurable experience, yet the simplicity of the tablet experience might draw some to choose the Surface Pro 4 instead. Each device rings in at a similar size, the Surface Pro 4 having a slightly smaller 12.3-inch screen when compared to the Surface Books 13.5 inch.

Either way, both Surface devices present one striking difference in terms of the interface; touch screen. Touch screen is a valuable tool to many that increases ease of use and productivity, especially when in an environment where a stable desk is unavailable. Furthermore, each device comes with a touch screen sensitive stylus, useful for things such as drawing diagrams and signing documents in a convenient fashion.

The difference between the Surface and the MacBook Air essentially boils down to what it is you’re looking for. If you want the more traditional laptop experience, while sacrificing the utility of a touch screen in exchange for a slightly more portable device, the MacBook Air may be what you’re interested in. However, if a tablet-style hybrid device is more your style (with the Surface Pro 4 airing much more on the side of tablet than the Surface Book), surface devices may be worth looking into. Either way, you’re getting an excellent portable workstation to fit whatever needs you may have.

Specs

i3-logo-2016getimageIntel-Core-i7-6500U-6th-Generation

When it comes to internal hardware, both the Apple and Microsoft options are surprisingly similar. Both the MacBook Air and the Surface can be configured with a variety of processors, the MacBook allowing either an i5 or a much beefier i7, while the Surface Pro 4 also allows for less powerful core m3 and i3 processors, the Surface Book however being locked to the previously mentioned i5 and i7 just like the MacBook.

For general use, an i5 is really all that the average person needs. However, if you plan on doing any sort of gaming on these machines (which is not recommended, due to the lack of a non-integrated graphics card in any the machines, with the only exception being the much higher end Surface Books), an i7 could be worth the extra money.

Basically; the m3 and i3 are basic processors capable of doing most anything the average user would need, perhaps slugging behind a bit when it comes to multitasking. The i5 is a much more capable chip for this, and if you really need the extra juice, the i7 will certainly get the job done.

Memory and storage are another important aspect of these devices. The MacBook Air can be configured to have up to 512gb of extremely speedy flash-based storage, as well as up to 8gb of internal memory. Unless you’re someone who has literally thousands of photos on their computer, this should definitely be enough for the average user in terms of storage. Furthermore, 8gb of memory should definitely be enough, and will only ever begin to slow you down in the most demanding of multitasking scenarios, such as rendering video for an editing project.

Both surface devices have very similar configurations, with the Surface Pro 4 ranging from 4gb of memory to 16gb, while the Surface Book is locked at either 8gb or 16gb. Internal storage is pretty much the same story; the Surface Pro 4 can handle up to 256gb of storage (half that of the MacBook), while the Surface Book can take an impressive 1tb of the same flash based storage as the MacBook.

What this boils down to is that, depending on how much you need, the Surface Book could be your best option for mass storage. If 8gb of memory just isn’t enough for you, and you have over 500gb of files that you need stored, the high configurations of the Surface Book may just be your only option, as the MacBook Air only has a few options.

However, for most people, I would say that each device is about equivalent in terms of storage and memory. I wouldn’t let this bother you too much when picking your device, as external drives are always a way to expand storage, and more than 8gb of memory really isn’t necessary for most users.

Price

To conclude, there’s one more category of discussion that needs to be touched upon: price.

Money-PNG

Both the Surface and the MacBook Air are devices which you can get for under 2000 dollars, with the Surface Pro 4 and MacBook Air both being available (at minimum conditions) for just under 1000.

MacBook Airs range from about 900 dollars for a minimum configuration 11-inch model, all the way up to 1200 dollars for a 13-inch model armed with 8gb of memory, 512gb of storage and a powerful i7 processor.

Surfaces, however, range quite a bit. You can get yourself a minimum configuration Surface Pro 4 for about 900 dollars, just like the MacBook, with the only difference being that the Surface Pro 4 is configurable to up to an 1800-dollar machine.

If you’re interested in a Surface Book, expect to pay about 1200 dollars for the cheapest configuration, with its options ranging up to a shocking 3000 dollars for the model with a 1tb solid state drive built into the machine.

Whichever device you get, all of them fulfill the same basic role: a sleek, powerful, portable device with productivity in mind. If I were to buy these devices, I’d either go for the 1200 dollar MacBook Air configured with an i7 processor and 8gb of memory, or the 1200-dollar Surface Book. While this Surface Book configuration does require you to use an i5 instead of an i7, the addition of a touch screen and stylus definitely win back the lost value.