The University of Massachusetts Amherst
Categories
Google Microsoft Software

NEWS FLASH: GM Buys Self-Driving Startup

The era of self driving cars is coming soon, as we all know, and GM accordingly bought a small startup called, Strobe, Inc. which now has a very large influence and is considered a dominant force in the movement towards autonomous driving. Strobe is a very youthful startup that has recently sold ‘Lider’ (laser radar), a piece of technology that is crucial to the autonomy of the self-driving car to General Motors for an undisclosed amount. As the article says, “…technology is according to many in the incipient self-driving world critical to vehicles that will someday achieve full autonomy and be able to drive themselves with no human input…” We can see that many different companies such as Tesla Autopilot, Cadillac Super Cruise and Google’s Waymo are involved in the process of developing self driving cars. The race to autonomy is on and we will soon see the result!

Categories
Microsoft Operating System Software Windows

Multiple Desktops in Windows 10

The concept of using multiple desktops isn’t new. Apple incorporated this feature back in 2007 starting with OS X 10.5 Leopard in the form of Spaces, allowing users to have up to 16 desktops at once. Since then, PC users have wondered if/when Microsoft would follow suit. Now, almost a decade later, they finally have.

Having more than one desktop allows you to separate your open windows into different groups and only focus on one group at a time. This makes it much easier to juggle working on multiple projects at once, giving each one a dedicated desktop. It’s also useful for keeping any distractions out of sight as you try to get your work done, while letting you easily shift into break mode at any time.

If you own a Windows computer and didn’t know about multiple desktops, you’re not alone! Microsoft didn’t include the feature natively until Windows 10, and even then they did it quietly with virtually no advertising for it at all. Here’s a quick guide on how to get started.

To access the desktops interface, simply hold the Windows Key and then press Tab. This will bring you to a page which lists the windows you currently have open. It will look something like this:

Here, you can see that I’ve got a few different tasks open. I’m trying to work on my art in MS Paint, but I keep getting distracted by YouTube videos and Moodle assignments. To make things a little easier, I can create a second desktop and divide these tasks up to focus on one at a time.

To create a new desktop, click the New desktop button in the bottom right corner of this screen. You will see the list of open desktops shown at the bottom:

Now you can see I have a clean slate on Desktop 2 to do whatever I want. You can select which desktop to enter by clicking on it. Once you are in a desktop, you can open up new pages there and it will only be open in that desktop. You can also move pages that are already open from one desktop to another. Let’s move my MS Paint window over to Desktop 2.

On the desktops interface, hovering over a desktop will bring up the list of open windows on that desktop. So, since I want to move a page from Desktop 1 to Desktop 2, I hover over Desktop 1 so I can see the MS Paint window. To move pages around, simply click and drag them to the desired desktop.

I dragged my MS Paint window over from Desktop 1 to Desktop 2. Now, when I open up Desktop 2, the only page I see is my beautiful artwork.

Finally, I can work on my art in peace without distractions! And if I decide I need a break and want to watch some YouTube videos, all I have to do is press Windows+Tab and select Desktop 1 where YouTube is already open.

If you’re still looking for a reason to upgrade to Windows 10, this could be the one. The feature really is super useful once you get the hang of it and figure out how to best use it for your needs. My only complaint is that we don’t have the ability to rename desktops, but this is minor and I’m sure it will be added in a future update.


Categories
Hardware Microsoft Software Windows

Tips for Gaming Better on a Budget Laptop

Whether you came to college with an old laptop, or want to buy a new one without breaking the bank, making our basic computers faster is something we’ve all thought about at some point. This article will show you some software tips and tricks to improve your gaming experience without losing your shirt, and at the end I’ll mention some budget hardware changes you can make to your laptop. First off, we’re going to talk about in-game settings.


In-Game Settings:

All games have built in settings to alter the individual user experience from controls to graphics to audio. We’ll be talking about graphics settings in this section, primarily the hardware intensive ones that don’t compromise the look of the game as much as others. This can also depend on the game and your individual GPU, so it can be helpful to research specific settings from other users in similar positions.

V-Sync:

V-Sync, or Vertical Synchronization, allows a game to synchronize the framerate with that of your monitor. Enabling this setting will increase the smoothness of the game. However, for lower end computers, you may be happy to just run the game at a stable FPS that is less than your monitor’s refresh rate. (Note – most monitors have a 60Hz or 60 FPS refresh rate). For that reason, you may want to disable it to allow for more stable low FPS performance.

Anti-Aliasing:

Anti-Aliasing, or AA for short, is a rendering option which reduces the jaggedness of lines in-game. Unfortunately the additional smoothness heavily impacts hardware usage, and disabling this while keeping other things like texture quality or draw distance higher can make big performance improvements without hurting a game’s appearance too much. Additionally, there are many different kinds of AA options that games might have settings for. MSAA (Multisampling AA), and the even more intensive, TXAA (Temporal AA), are both better smoothing processes that have an even bigger impact on performance. Therefore turning these off on lower-end machines is almost always a must. FXAA (Fast Approximate AA) uses the least processing power, and can therefore be a nice setting to leave on if your computer can handle it.

Anisotropic Filtering (AF):

This setting adds depth of field to a game, by making things further away from your character blurrier. Making things blurrier might seem like it would make things faster, however it actually puts a greater strain on your system as it needs to make additional calculations to initiate the affect. Shutting this off can yield improvements in performance, and some players even prefer it, as it allows them to see distant objects more clearly.

Other Settings:

While the aforementioned are the heaviest hitters in terms of performance, changing some other settings can help increase stability and performance too (beyond just simple texture quality and draw distance tweaks). Shadows and reflections are often unnoticed compared to other effects, so while you may not need to turn them off, turning them down can definitely make an impact. Motion blur should be turned off completely, as it can make quick movements result in heavy lag spikes.

Individual Tweaks:

The guide above is a good starting point for graphics settings; because there are so many different models, there are any equally large number of combinations of settings. From this point, you can start to increase settings slowly to find the sweet spot between performance and quality.

Software:

Before we talk about some more advanced tips, it’s good practice to close applications that you are not using to increase free CPU, Memory, and Disk space. This alone will help immensely in allowing games to run better on your system.

Task Manager Basics:

Assuming you’ve tried to game on a slower computer, you’ll know how annoying it is when the game is running fine and suddenly everything slows down to slideshow speed and you fall off a cliff. Chances are that this kind of lag spike is caused by other “tasks” running in the background, and preventing the game you are running from using the power it needs to keep going. Or perhaps your computer has been on for awhile, so when you start the game, it runs slower than its maximum speed. Even though you hit the “X” button on a window, what’s called the “process tree” may not have been completely terminated. (Think of this like cutting down a weed but leaving the roots.) This can result in more resources being taken up by idle programs that you aren’t using right now. It’s at this point that Task Manager becomes your best friend. To open Task Manager, simply press CTRL + SHIFT + ESC at the same time or press CTRL + ALT + DEL at the same time and select Task Manager from the menu. When it first appears, you’ll notice that only the programs you have open will appear; click the “More Details” Button at the bottom of the window to expand Task Manager. Now you’ll see a series of tabs, the first one being “Processes” – which gives you an excellent overview of everything your CPU, Memory, Disk, and Network are crunching on. Clicking on any of these will bring the process using the highest amount of each resource to the top of the column. Now you can see what’s really using your computer’s processing power. It is important to realize that many of these processes are part of your operating system, and therefore cannot be terminated without causing system instability. However things like Google Chrome and other applications can be closed by right-clicking and hitting “End Task”. If you’re ever unsure of whether you can end a process or not safely, a quick google of the process in question will most likely point you in the right direction.

Startup Processes:

Here is where you can really make a difference to your computer’s overall performance, not just for gaming. From Task Manager, if you select the “Startup” tab, you will see a list of all programs and services that can start when your computer is turned on. Task Manager will give an impact rating of how much each task slows down your computers boot time. The gaming app Steam, for example, can noticeably slow down a computer on startup. A good rule of thumb is to allow virus protection to start with Windows, however everything else is up to individual preference. Shutting down these processes on startup can prevent unnecessary tasks from ever being opened, and allow for more hardware resource availability for gaming.

Power Usage:

You probably know that unlike desktops, laptops contain a battery. What you may not know is that you can alter your battery’s behavior to increase performance, as long as you don’t mind it draining a little faster. On the taskbar, which is by default located at the bottom of your screen, you will notice a collection of small icons next to the date and time on the right, one of which looks like a battery. Left-clicking will bring up the menu shown below, however right-clicking will bring up a menu with an option “Power Options” on it.


Clicking this will bring up a settings window which allows you to change and customize your power plan for your needs. By default it is set to “Balanced”, but changing to “High Performance” can increase your computer’s gaming potential significantly. Be warned that battery duration will decrease on the High Performance setting, although it is possible to change the battery’s behavior separately for when your computer is using the battery or plugged in.

Hardware:

Unlike desktops, for laptops there are not many upgrade paths. However one option exists for almost every computer that can have a massive effect on performance if you’re willing to spend a little extra.

Hard Disk (HDD) to Solid State (SSD) Drive Upgrade:

Chances are that if you have a budget computer, it probably came with a traditional spinning hard drive. For manufacturers, this makes sense as they are cheaper than solid states, and work perfectly well for light use. Games can be very demanding on laptop HDDs to recall and store data very quickly, sometimes causing them to fall behind. Additionally, laptops have motion sensors built into them which restrict read/write capabilities when the computer is in motion to prevent damage to the spinning disk inside the HDD. An upgrade to a SSD not only eliminates this restriction, but also has a much faster read/write time due to the lack of any moving parts. Although SSDs can get quite expensive depending on the size you want, companies such as Crucial or Kingston offer a comparatively cheap solution to Samsung or Intel while still giving you the core benefits of a SSD. Although there are a plethora of tutorials online demonstrating how to install a new drive into your laptop, make sure you’re comfortable with all the dangers before attempting, or simply take your laptop into a repair store to have them do it for you. It’s worth mentioning that when you install a new drive, you will need to reinstall Windows, and all your applications from your old drive.

Memory Upgrade (RAM):

Some laptops have an extra memory slot, or just ship with a lower capacity than what they are capable of holding. Most budget laptops will ship with 4GB of memory, which is often not enough to support both the system, and a game.

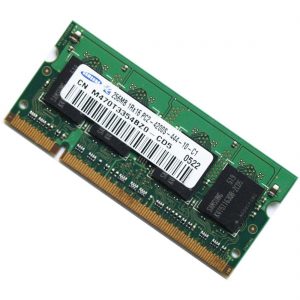
Upgrading or increasing memory can give your computer more headroom to process and store data without lagging up your entire system. Unlike with SSD upgrades, memory is very specific and it is very easy to buy a new stick that fits in your computer, but does not function with its other components. It is therefore critical to do your research before buying any more memory for your computer; that includes finding out your model’s maximum capacity, speed, and generation. The online technology store, Newegg, has a service here that can help you find compatible memory types for your machine.

Disclaimer: 

While these tips and tricks can help your computer to run games faster, there is a limit to what hardware is capable of. Budget laptops are great for the price point, and these user tricks will help squeeze out all their potential, but some games will simply not run on your machine. Make sure to check a game’s minimum and recommended specs before purchasing/downloading. If your computer falls short of minimum requirements, it might be time to find a different game or upgrade your setup.

Categories
Mac OSX Microsoft Operating System Software Windows

Step-by-step walkthrough of downloading Office 365 Education

Microsoft Office is a useful suite of productivity applications that includes Word, Excel, Powerpoint, Outlook, Access, and OneNote. Microsoft provides a no-cost subscription to college students, faculty, and staff to install these programs on up to 5 devices. Here’s a step-by-step guide on how to get your free access to Microsoft Office 365:

  1. Navigate to the UMass IT website.
  2. Click on Software.
    UMass IT Website
  3. Scroll down, and in the Microsoft table, click on Microsoft Office 365 Education
    UMass IT Website - Microsoft Table
  4. A. If you are a student, click on the Microsoft Office 365 web site under the student section.
    UMass IT Website - Student 365 Link
    1.  If you are a faculty or staff member, click on the Microsoft Office 365 web site under the faculty and staff section.
      UMass IT Website - Faculty 365 Link
  5. Once on the landing page for Office 365, fill in your UMass email address and click Get started.
    Office 365 Education Landing Page
  6. A. If you are a student, click on I’m a Student
    B. Click on I’m a Teacher if you are either a faculty or staff member. The I’m a Teacher option will work if you are either a faculty or staff member.
    Microsoft Office 365 Education - Student or Teacher
  7. Check your UMass email for the confirmation email and click the Yes, that’s me link.
    Microsoft Office 365 Email Confirmation
  8. Create your account using your personal information.Microsoft Office 365 Education - Create Account
  9. Click Skip on the invitation page.
    Microsoft Office 365 Education - Invite Page
  10. Download your software by clicking the Install now button! If you don’t want anything in your web browser changed, make sure to uncheck the two boxes above the Install now button.
    Microsoft Office 365 Education - Download Software
    A. If you’re on Windows, this will download the installer for Word, Excel, Powerpoint, Outlook, Access, Publisher, Skype for Business, and OneDrive for Business.
    B. If you’re on OS X, it will download the installer for Word, Excel, Powerpoint, Outlook, and OneNote.
    With the Office 365 subscription, you will also have access to the Office Online suite of productivity software, all of which is listed below the install button.
  11. Once the installer is downloaded, run the installer.
    office365installer
  12. When the software is installed, you will be able to open any Office Suite program and use it as normal.
    Note: it may prompt you to sign in. If it does, be sure to use the same email address and password that you used when you signed up for Office 365 at the beginning of this walkthrough.
  13. You’re done! Enjoy Office 365 for the duration of your time at UMass Amherst!
Categories
Microsoft Software

Formatting in Word – Not Frequently Asked Questions

You have a mysterious railing sentence. I bolded it for you.

I write a lot of papers. I am an undergraduate, I take gen-eds that require essays, and I typically have to follow MLA format. No matter how long I write in MLA I still have some questions regarding how to format it in Microsoft Word. Those annoying formatting issues that just pop up. I hope to solve a few of those not-frequently asked questions that come up when writing a paper.

Q: You know when you are writing a paragraph and one line falls over to the next page and Microsoft Word helpfully adds a line of text? How do I stop that?

A: These are called widows and orphans. When you are writing a paragraph and you get a one line spillover this is called a widow. An orphan is when you are writing a paragraph and one word makes up your last line of text. Both of these can be really annoying.

Quick and Dirty Fix: If you are not writing in MLA format and you don’t care about margin space then you can just change the margin size [page layout –> margins –> and change margins to your will]. Or, a quicker and dirtier fix is just changing your paragraph to eliminate a sentence or add some more. The issue with this fix is that when you go back and edit your entire paper and you may end up

Actual Fix: If you hope to actually fix this issue Word has a real fix for it too. It’s actually really easy too. The simple fix is [file –> paragraph –> line and page breaks tab –> uncheck the widow/orphan control box]

Q: Talk to me about strikethrough

A: I use strikethrough when making lists and I want to show that I have marked something off the list. This is what strikethrough looks like. There is no direct keyboard shortcut for strikethrough. Instead, you have to go through font every time. The steps are [highlight desired text to be stricken –> right click –> scroll down to font –> under the font tab –> check the strikethrough box]

Q: I do a lot of chemistry homework and I use a lot of super and subscripts. Please tell me there is a keyboard shortcut

A: I’m going to copy and paste Microsoft’s answer to this problem:

  • For superscript, select the text or number that you want, and then press Ctrl, Shift, and the Plus sign (+) at the same time.
  • For subscript, select the text or number that you want, and then press Ctrl and the Equal sign (=) at the same time.

Q: I accidentally wrote a paragraph in CapsLock and I don’t want to rewrite it. Is there a fix?

A: There is! And while researching this I audibly gasped because I thought it was impossible. The steps are to highlight the text you want to change the case of, and then press [shift+F3].

Hopefully these tips will help save you some time when you’re next writing a paper this semester. Additionally, check out the IT website for how UMass students, faculty, and staff can sign up for Office 365.

Categories
Microsoft Operating System Software

Office 2016: What it looks like so far.

office

The second half of 2015 is going to be a busy time in the tech world with the releases of OSX 10.11, iOS 9, Windows 10, and the newest iteration of the Microsoft Office Suite. With so much going on it can be hard to stay on top of the most recent developments, new features, and release date rumors, but for Office 2016 here’s what we know for sure is going to be included in this latest version.

Who is Office 2016 for?

Great question! The short answer is everyone. Office 2016 will be released for Mac, Windows, Android, iOS, and web-based platforms. Microsoft hopes that beginning with this release, Office will not require the user to actually be in the office to do their work. The Office apps will be available for installation on mobile devices like phones and tablets as well as computers so that users can get their work done wherever they happen to be.

What’s new in Office 2016?

There are a whole host of new features in the new office released. I’ll talk about a few of the most exciting changes here, but if you are interested in the full list of changes check out this article on office.com.

One of the most exciting features being implemented in the new iteration of office is real-time co-authoring. This is a feature that has been available for a while on web-based office suites like google docs and even office online. Real-time co-authoring allows users to work on the same document simultaneously with each user’s changes made visible immediately to all of the other users. Currently co-authoring is only available in word documents that are stored on either OneDrive (microsoft’s cloud) or Office 365 sharepoint sites; however, Microsoft has indicated that they hope to make this feature available in all office apps.

Another new feature in Office 2016 is the Tell Me feature. Reminiscent of the old office assistant Clippy (except less annoying and more useful), the Tell Me feature allows users to search for commands from within the office apps. The great thing about Tell Me is that it works with plain english meaning you don’t have to know the exact name of the feature you are looking for. Typing something like “draw arrows” will bring up the smart shape toolbar, or typing “change bullet points” brings up the list formatting menu to change bullet styles. The Tell Me feature will save a lot of time as users will no longer have to scour the internet for help finding the feature they need, and just tell office what they want to do.

Microsoft has also expressed that starting with Office 2016 they intend for Office to be a platform rather than just a suite of applications. At first this won’t have much of an effect on users, but Microsoft hopes that more third-party developers will build plugins to be used with office. For example, you might have an uber plugin installed that will allow you to schedule rides as you add events to your calendar in outlook.

With this exciting new range of features, Office 2016 is shaping up to be more than just a new version of the same software, but rather the next step in productive computing.

When is Office 2016 being released?

Mac users with an Office 365 subscription can already download an official release of Office 2016. For other operating systems, users with an Office 365 subscription can download a preview release of Office 2016 that will automatically update to the official release of Office 2016 on release date. For users not in these two groups the latest word is that Office 2016 will be available in late 2015, perhaps sometime around september.

How do I get my copy of Office 2016?

Fortunately, Office is available to most members of the university either for free or at extremely reduced cost. To check if you qualify go to this page. If you already have office, and you’re interested in the preview copy of 2016 take a look at this page.

Categories
Microsoft Operating System Software Windows

Customizing your Command Prompt

A little known fact about the vast treasure trove of commands that make up the Windows Command Prompt is that it can be customized to your liking with just a little bit of tweaking in the settings. You can change things like font size, color, shape, or even the window itself!

Categories
Microsoft Software

Microsoft Office 2013

            For those of you upgrading from Microsoft Office 2007, you likely won’t find many major changes in Microsoft Office 2013.  If you are upgrading from a version of Microsoft Office prior to 2007, the concept of the ribbon, essentially a more visual-oriented version of your drop-down menus, and other cosmetic changes, may catch you off guard.  Rest assured, most of your favorite and essential functions are still there, alongside some new functionality tools to easily enhance your productivity.  Microsoft Office 2013 continues to provide users with maximum functionality while being more visual-based in the approach.  It is much easier to preview what things will look like before you commit to changes, and customize your files to be exactly what you want.  We’ll touch on some of the common changes among all of the Microsoft Office products, then do a program-specific breakdown for Microsoft Word, Excel, PowerPoint.

Categories
Microsoft Software

OneDrive

What is OneDrive?

Microsoft’s OneDrive provides one place where users can keep and share photos, videos, notes, documents, and surveys and be able to access them on any machine by just logging in.  If you’re using the most recent Office 2013 suite, or have a Windows 8 device, you have likely seen the OneDrive icon/save option, as it is built into most of Microsoft’s latest applications, for the convenience of the user. You need a Microsoft account to get started, but if you are already using Windows 8 or Office, you should have one set up.

Categories
Microsoft Operating System Software Windows

How to Install Windows

Installing an operating system is a complex endeavor, and requires a fair amount of computer expertise in order to accomplish. This guide is written with the goal of making this process as easy as possible, but it is important to understand that it is still a generalized guide. Installing an operating system can have drastically different results depending on the exact hardware installed in your computer. This guide should work for the majority of computer setups, but may require some troubleshooting and tweaking in certain circumstances.

Categories
Microsoft Software

Microsoft Office 2013 Server Issues: Resolved

FIX-Error-Sorry-We-Are-Having-Some-Temporary-Server-Issues-For-Office-2013

Some members of the UMass Community have had activation problems with Microsoft Office 2013. Upon opening Office files or attempt activations, the user is shown “Sorry, we are having some temporary server issues”. The problem is related to Internet Explorer, and resetting the program seems to fix the problem. First, activate your Office product offline. Next, reset Internet Explorer settings to default.

Categories
Microsoft Software

Creating a Budget in Excel

Creating a budget is a great way to efficiently manage your money. Excel and other spreadsheet software can be useful tools when it comes to budgeting. To start, gather any paperwork or information that you may have regarding monthly income and expenses.

Categories
Mac OSX Microsoft Software Web Windows

Office 365: Office for University Students

EDIT: The pricing information in this article is out of date. Please see the article here for up to date information on how UMass students can obtain Office 365 for free.

What is Office 365?

Everyone knows about Microsoft Office 2013, Microsoft’s latest version of their popular productivity suite, yet few people have heard of Office 2013’s cousin in the cloud: Office 365.

Office 365 is the latest addition to Microsoft’s Office product line. It offers the same Office software packages as Office 2013 Professional, but with two primary differences. The first being that Office 365 includes complementary cloud storage space as well as a number of additional features, and the second difference is that Office 365 is sold as a yearly subscription rather than as a flat rate, one-time purchase.

Categories
Adobe Microsoft Operating System Security Software Virus/Malware Web Windows

The 5 Most Important Things to Take Away From OIT’s NSO Presentation

Categories
Microsoft Operating System Software Windows

Diskpart

Diskpart is a very useful tool, not only for diagnosing problems, but also fixing them. Diskpart is an application that can be started via command prompt or by starting the app separately. If starting diskpart via Command Prompt, open a command prompt window and type “diskpart” and then hit enter. Diskpart grants access to a different set of commands which can be used to manipulate the hard disks in a windows-based computer. The capabilities of diskpart are very extensive and will require not a small amount of personal investigation in order to fully understand and utilize the program.

Categories
Microsoft Software

Microsoft Word 2007 hangs when switching documents

People come into Software Support frequently with complaints about MS Word being slow or unresponsive.  I have noticed that MS Word add-ins are often to blame for these performance issues, especially by introducing a delay before starting Word or switching from one document to another.  Most of these users have multiple Word add-ins (whether they are aware of the fact or not) and so here is a very quick guide to check to see if add-ins are your issue.

The general idea is to disable add-ins and check to see if disabling a certain add-in made word significantly more responsive.  If it did, then either look into updating it or keeping it disabled if you don’t use it.  The steps for disabling an Add-in are follow:

1) Go to the Office menu, then select Word Options

2) Go to Add-Ins and take a look at the Active Application Add-ins.  Often an Adobe product will be in this list and it is often this entry that is the issue.  Select the Add-in you want to disable and press Go…

3) Deselect an Add-in (uncheck the box next to it) and hit OK.  Sometimes you’ll get the following error:

If you get this error and are running Windows Vista, close Word, navigate to C:/Program Files/Microsoft Office/Office12/ and right click on WINWORD.EXE.  Select Run as Administrator and follow the above steps again.