
Did we hear that right? Week 8? Time has been flying by, and as we approach the final stretch, our focus is on the last exterior layer of our walls: siding. Our house features two types of siding, both horizontal and vertical, which require different procedures for installation.
To prepare for siding, we had to ensure that our strapping was ready first. We began the week by fine tuning the strapping by eliminating any waves in the wood strips. This ensures that the siding lays flat once it is nailed to these members. For the main house, this involved using long levels and straight edges to adjust the 8″ strapping attachment screws, ensuring the vertical strapping was as close to a single plane as possible.

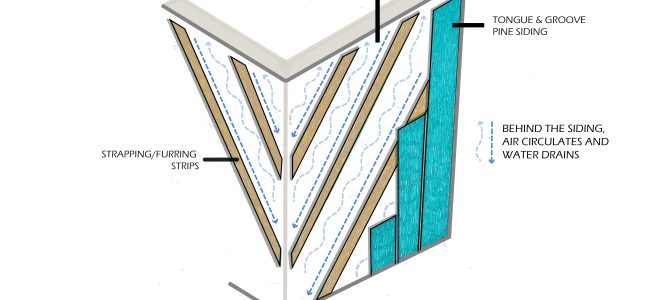
On the barnacle, we opted for diagonal strapping to hold our vertical siding, which allows for a rain screen and ventilation space between the outboard insulation with WRB and the siding. Horizontal strapping wouldn’t work in this case as it would hinder continuous air and water fdrainage. Likewise, vertical strapping wasn’t suitable for the vertical siding because it wouldn’t provide the necessary nailing surface. One other solution is to set horizontal furring strips over vertical ones in a grid; however, this adds inches to our wall that we cannot spare! Thus, we settled for diagonal orientation, giving us a secure nailing surface and allowing for airflow.

Tuesday saw the completion of diagonal strapping, followed by the addition of corner boards to the main house. Due to the rainy summer in Western Mass, the ground beneath our structure has shifted and settled in some areas, causing a slight settling of the project. We used hydraulic jacks to raise and level the building and added shims to the foundation piers to rectify the issue. However, the rain proved to have the last word, and we had to halt work early at 2:30 pm.

We use measured gauges called “geckos” to ensure a consistent reveal of the siding. 
Creating “storyboards” with lines indicating the bottom of each clapboard strip to transfer onto corner boards.
Wednesday finally marked the start of siding installation! Two teams worked on the gabled sides of the main house, while another team began siding the barnacle. As previously mentioned, the siding on the main house required a different technique from the siding on the barnacle. The main house is clad in horizontal cement clapboards (Hardie Board), which are painted, cut to size, and attached to the vertical furring strips using construction adhesive and a nail gun. We used measured gauges to ensure that the “reveal” (the amount of the siding you will end up seeing) is consistent. We also marked out the layout of the clapboards on each of the four corner boards to make sure that there is continuity of clapboard levels across each side of the structure.


For the vertical siding we are using tongue and groove white pine boards (rough side out”, which are also painted and attached to the strapping with glue and nails. Installing them required precision; The siding must be carefully slid into place so that the tongue and groove interlock while maintaining a level position. Glue was applied to the back of the boards near the tongue and groove connections, avoiding the tongue and groove itself to accommodate wood expansion due to moisture.


Inside the house, electrical work continued with another visit from Zack Walters from Graham Electric. One of the major electrical challenges we faced was figuring out how to run the wiring to a connecting junction box, given that we would be removing the roof and upper wall sections for transport. We aimed to minimize tricky connection points between these two pieces. In the ceiling, we have lights, smoke detectors, and ERV lines that need to pass through a junction box to reach the Main Electric Panel in the hallway. Each circuit must have a “home run” or direct line back to the breaker panel, which results in numerous cables running through the walls and under the floor to ensure proper electrical connections throughout the house. Additionally, drivers were installed for our LED wafer lights (our ceiling lighting); these drivers convert the 120-volt alternating current from our power source into the direct current that LEDs use – a very efficient light source. To ensure easy maintenance access, the drivers are placed below Majrex, a membrane that will hold the dense pack cellulose insulation in place (a product from SIGA, whom we thank once again) as well as provide the vapor retarding barrier and redundant air barrier. To demonstrate our intended set up to electrical inspectors, smaller pieces of the membrane are attached around the drivers. This way, the drivers will remain accessible even after the ceiling is insulated.
Despite all the talk about electrical solutions, fate had a twist in store for us: the day ended with a power outage at the site. Nevertheless, the siding teams made some good headway, completing six courses on the east wall and one entire wall of the barnacle.
Thursday saw us continue siding up to windows and exterior outlets, which presented some challenges on the west wall facing the driveway. The inclusion of a potential 240-volt electric vehicle charging outlet and the exterior meter box meant cutting into our siding boards. While cutting wooden boards posed no significant issue, fiber cement siding proved more challenging, quickly dulling blades and creating fine cement dust. Using mechanical shears had been the go-to for cutting the boards down to size, but these shears are not very precise and are hard to maneuver around tight corners. In order to create clean cuts, we tried various other tools like a jigsaw, a multitool, and an angle grinder. Despite facing some challenges that required adjustments, we persevered, completing the siding around the windows.
Siding continued into Friday, and the gable ends of the house were covered up to the breaks between the roof and wall sections. Meanwhile, the barnacle saw significant completion, with painted cladding boards adorning its three exterior walls. The siding is coming along nicely, and we always make sure that things are kept level, plumb, straight, and square. The Paper House is starting to look optimistically finished as we head into the final week of our build. Stay tuned for more updates on our construction journey!

If you forget a fork, just make your own chopsticks. 
Celebrating the final workday for our PHD students, Diana and Amir. (Thank you for the desserts, Hongjia!) 