

Despite a shortened week due to the 4th of July holiday, our team made every movement count. This week, we navigated the complexities of insulation, weather barriers, and electrical layouts.
Returning to the site after the long weekend, we encountered an unfortunate situation. The plastic covering on the barnacle had come loose in the wind and rain, resulting in water infiltration. Water entered not only into the polyiso insulation boards, but also between the foil covered insulation and the water resistant ZIP sheathing. The shady location of the barnacle meant that there was no opportunity for the insulation to dry. We instead addressed this issue by:
- Removing the insulation
- Letting it dry out in the sun
- Taping up screw holes from the initial polyiso install in the ZIP Board
- Reattaching the dried insulation
With the completion of window installations, we were able to proceed with insulating the rest of the building. This painstaking process ensured the integrity and protection of our outboard insulation system.

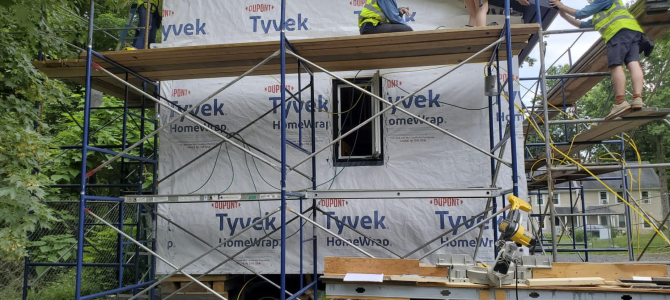
Once the outboard insulation was secured, the next step was to attach the Weather Resistant Barrier (WRB) to the exterior of polyiso insulation. We are using Tyvek house wrap, a common and cost effective WRB that you may be familiar with. To understand the purpose of each layer in our construction, let’s break it down:
- Wood framing
- The ZIP sheathing system also donated by rk Miles
- Includes oriented strand board with proprietary water resistant coating and taped seams
- Acts as our primary air barrier
- Attached directed to the outside of the framing
- Repurposed Polyiso foam board (zero carbon impact) donated by Green Insulation Group
- Outboard insulation
- Reduces the chance of condensation on the first condensing surface of the assembly — the interior side of the Zip sheathing
- Attached to outside of the ZIP sheathing system
- Tyvek house wrap taped with proprietary Tyvek Tape
- Water Resistant Barrier, keeps any bulk water that penetrates the Rain Screen (more on this term later) from entering from the outside
- Stapled onto the outboard insulation

As some of the students worked on insulation and house wrap, others kept working to detail our roof overhangs, including installing the soffit vents and trim pieces. Work continued inside the building on the ERV system ducting as well.
Later on Wednesday, we were visited by Zack Walters from Graham Electric, who guided us through the electrical rough-in process. Analyzing our electrical plan, Zack offered valuable insights, recommending adjustments for improving light distribution and assorted receptacle locations.
The next day, armed with materials and guidance, we embarked on the rough-in. Our team was divided into groups of 2 or 3, and each one was tasked with a different electrical area of the house. These groups installed switch and outlet boxes, closet light mounts, and marked out ideal ceiling light placements. Adhering to electrical code requirements, we ensured a well-organized and functional layout.

Some rules to abide by in electrical layouts include:
- Any wall more than 2 feet long must include an outlet
- There must be an outlet no more than 6 feet from a door, and outlets must be no more than 12 feet apart
- In the bathroom, an outlet must not be more than 3 feet from the sink
- In the kitchen, there must not be any spot on the countertop where you are more than 2 feet from an outlet– outlet 2 feet from the end of the counter, and then 4 feet between outlets (think, appliances have 2 foot cords)
On Friday, the kitchen team began their wiring, pulling wires from the switches and receptacles to the breaker panel. As per Zack’s suggestion, rather than bringing all the wires up and over to each piece, we are instead threading most of them down through the floor assembly, meaning getting comfortable on your back under the house.


As kitchen wiring commenced, other students continued work on the vented eaves and roof trim, carefully measuring, cutting, fitting, and nailing these essential details. Inconsistencies in wood can make this a frustrating task, but is part of the challenge of light frame wood construction.

With the completion of Tyvek installation, our focus shifted towards preparing to secure strapping next week, which will providing stability and a rain screen for our future siding.


After preparing our site for a rainy weekend, we reconvened off-site for a mid-build dinner party. Professor Fiocchi graciously hosted us, offering a glimpse into his energy efficient home inspired by the architecture of Frank Lloyd Wright. We enjoyed chatting with one another, playing with the Fiocchi’s poodle, and exploring their charming home. Many thanks to Carl and his wife Jackie for their hospitality!


